Wednesday, February 26, 2020

KittyCat Stove

KittyCat Stove

Name of stove: KittyCat, a smaller version of the cat stove.

Type of stove: Double walled, unpressurized. Basically a cup with a cap on it.

URL of original instructions: See Roy Robinson’s Cat Food Can Alcohol Stove: http://bit.ly/LTxMAs (For general info on lightweight do-it-yourself stoves, see the Zenstoves links page at http://bit.ly/9fZe6O)

Description of difficulty: Hardly more than the cup stove.

Overview: This is a stove with a can over it. The stove itself can actually be of just about any design. The can over it forms an air jacket that serves to insulate the stove and warm incoming air, protect the stove from breezes, and can be used to restrict the amount of air available.

The version described here is about as simple as you can make it. The stove is a plain cup, and the outer sleeve is another can that just sits over it. The sleeve has vent holes in its sides and a burner hole cut into its bottom, which becomes the top of the stove. The cup sits inside this and just holds the fuel.

If you follow the original instructions and use a steel tuna can for the outer sleeve, your stove will end up both heavy and bulky, relatively speaking, though if you like the design you can slim it down by using smaller and lighter cans. That is what these plans describe here, and since this stove is smaller, I’ve renamed it and call it the KittyCat stove.

Think this name will improve my image, make me seem more fuzzy and cuddly, attractive to women? I.e. help me get chicks? Yeah, right, no.

The plus side of using the original cat stove design is that the inner and outer pieces become permanently attached (by friction from bent pieces of metal) as the stove is made, so you have only one piece to handle. The downside of this, if you think of it as that, is that the stove becomes a little harder to light, since you have to stick a match down into it.

With the version described here you fill the stove with fuel, light it, and set the outer sleeve over the burner. The two pieces are not physically bonded to each other. So this version is a lot easier to light, but you also have two separate pieces to keep track of.

With either version you can stuff the burner with fiberglass insulation to make a wick. A wick like this gives a stove a more regulated burn, and the flame tapers down gradually as the fuel runs out, but also ends up burning so low that it puts out almost no heat, and can still keep burning that way for many long minutes. Your choice.

Technical details:

Stove Height:1.25" (32 mm).
Stove Diameter:2" (50 mm).
Sleeve Height:1.5" (36 mm).
Sleeve Diameter:2.6" (65 mm).
Weight, total:0.30 ounce (8.5 g).
Volume:1 ounce (30 ml).
Composition:Aluminum can from Wal-Mart sandwich spread, or Spam sandwich spread, as with the Spamster stove, plus a 5.5 ounce juice can.

Materials list:

Empty 5.5 ounce (163 ml) aluminum juice can (for stove)
Empty can from Spam sandwich spread, or a similar can (for sleeve)
Electric or manual drill, with 1/16" (or 3/32"), and 1/4" bits
Ruler
Leather work gloves
Marking pen
Pushpin, heavy safety pin or heavy needle
Sandpaper (100 grit, or thereabouts)
Sheet of paper
Tape
Utility knife

Overview of construction process: First you’ll make a cup, and then an outer sleeve for it.

Step-by-step construction

1: Mark the can for the cup.

This cup is similar to the OCUP’s cup but smaller. See the photos there for guidance.

Put a line near the bottom of the can to show you where to cut.

Set the can down on a smooth surface like a kitchen counter top. Next to it, plunk down several magazines. Lay your marking pen on the top magazine, push the can over to it, and measure where the point of the pen meets the can. You’re looking for a point 1.25" (32 mm) up from the bottom of the can.

If the pen point is either too high or too low, shuffle different magazines until you get a stack that’s the right height. You may have to do some fine tuning with scrap sheets of cardboard from the back of a tablet of paper, or several thicknesses of paper – what you use doesn’t matter much. You can sandwich any loose sheets of paper in between two of the magazines. That will keep them in place.

Then hold down the pen down and turn the can through one or two revolutions until you have a clear, dark line of ink going around the can at a height of 1.25" (32 mm).

Using this height will give the stove a deep enough well for fuel.

2: Score the can.

Once you have a line drawn around the outside of the can, set aside the pen and put the utility knife in its place. Be sure the knife has a sharp, new blade in it. And it’s a good idea to wear work gloves for this step, especially leather gloves if you have them.

Lay the knife down flat on its side on top of your pile of magazines and put the blade’s point up to the can. Adjust the height until the point hits the line you’ve just drawn. Hold the knife down with one hand and rotate the can with the other hand, scoring the can. Push the blade against the can, but not hard enough to dent it.

Keep turning the can carefully for several revolutions. You want to make a deeper and deeper score line in the side of the can, and you want to keep the knife in the same groove on each pass. This is pretty hard to do perfectly, but get as close as you can. You are not trying to cut through the can, only to score it.

3: Break off the cup.

When you think you’ve cut most of the way through the side wall of the can you need to stress it. Use the back side of your knife’s blade (the dull side) or your thumb. Press hard enough to flex the side of the can a little without denting it, and move back and forth along the score line.

Stress a short section of the the can wall this way over and over again. What you’re doing here is trying to fatigue the metal of the can until it breaks apart. This will give you a cleaner result than if you cut through the can.

This part of the process is trial and error, so just keep at it until you find a scored part of the can’s wall that just lets go. You can go back to scoring the side again for awhile, to deepen the cut if this doesn’t seem to be working.

Once part of the scored line breaks through you can keep working along it, turning the can and breaking it apart along your scored line until the top part separates from the bottom part. Once you get the process started, it will be a give and take between stressing the metal and gently pulling the two halves of the can away from each other.

Work very gently. The two main things to keep in mind are not to damage the can and not to get cut. The can will separate when it’s ready.

When done with this first step you’ll have the bottom 1.25" (32 mm) of the can separated from the top.

4: Dull the cup’s sharp edges.

Now take up your sandpaper, hold the bottom (your new stove, the cup-like part) in one hand, the sandpaper in the other, and scuff the fresh edge with the sandpaper. You want to run the sandpaper in three different directions: flat across the cut edge, outside, but angled toward the inside of the stove, and inside, but angled toward the outside.

In other words, you want to cover all the angles, and remove every sharp edge there is. This is important, because this thin metal is just about as close as you can get to a free-range razor blade. It is deadly sharp. Please read that again if it didn’t sink in. IT IS SHARP!

5: Prepare the sleeve.

Remove the top of the other can (using the handy dandy built-in pull tab) remove the contents, wash and dry the can, and dull all the sharp edges where you removed the top.

6: Make a ventilation template.

First, remove the label from the can.

Take a full-sized sheet of paper (8.5" by 11") and cut off a strip along the long edge. It should be one inch wide (25 mm). The whole strip should measure 1" by 11" (25 by 279 mm).

Make several marks 0.25" (6 mm) in from the factory-cut edge and use a ruler to connect them into a line.

Using a small piece of tape (so you can easily remove it again in just a minute) stick one end of this paper strip to the side of the can.

Then wrap this strip of paper around the can, overlap the two ends, and mark the inner layer where the outer layer of the paper strip overlaps it. Take the paper off the can. Take the paper off the can.

Now you’ll have a strip of paper with a mark on it. Cut on the line. What you have left is a strip of paper equal in length to the can’s circumference. That’s what you want.

Then fold this strip of paper in half three times (the long way). Unfold it and mark the point where each crease intersects the line you drew along the length of the strip. You will have seven marks. These will mark seven of your eight ventilation holes. The eighth hole will go where the two ends of the paper strip meet when you tape it back onto the can.

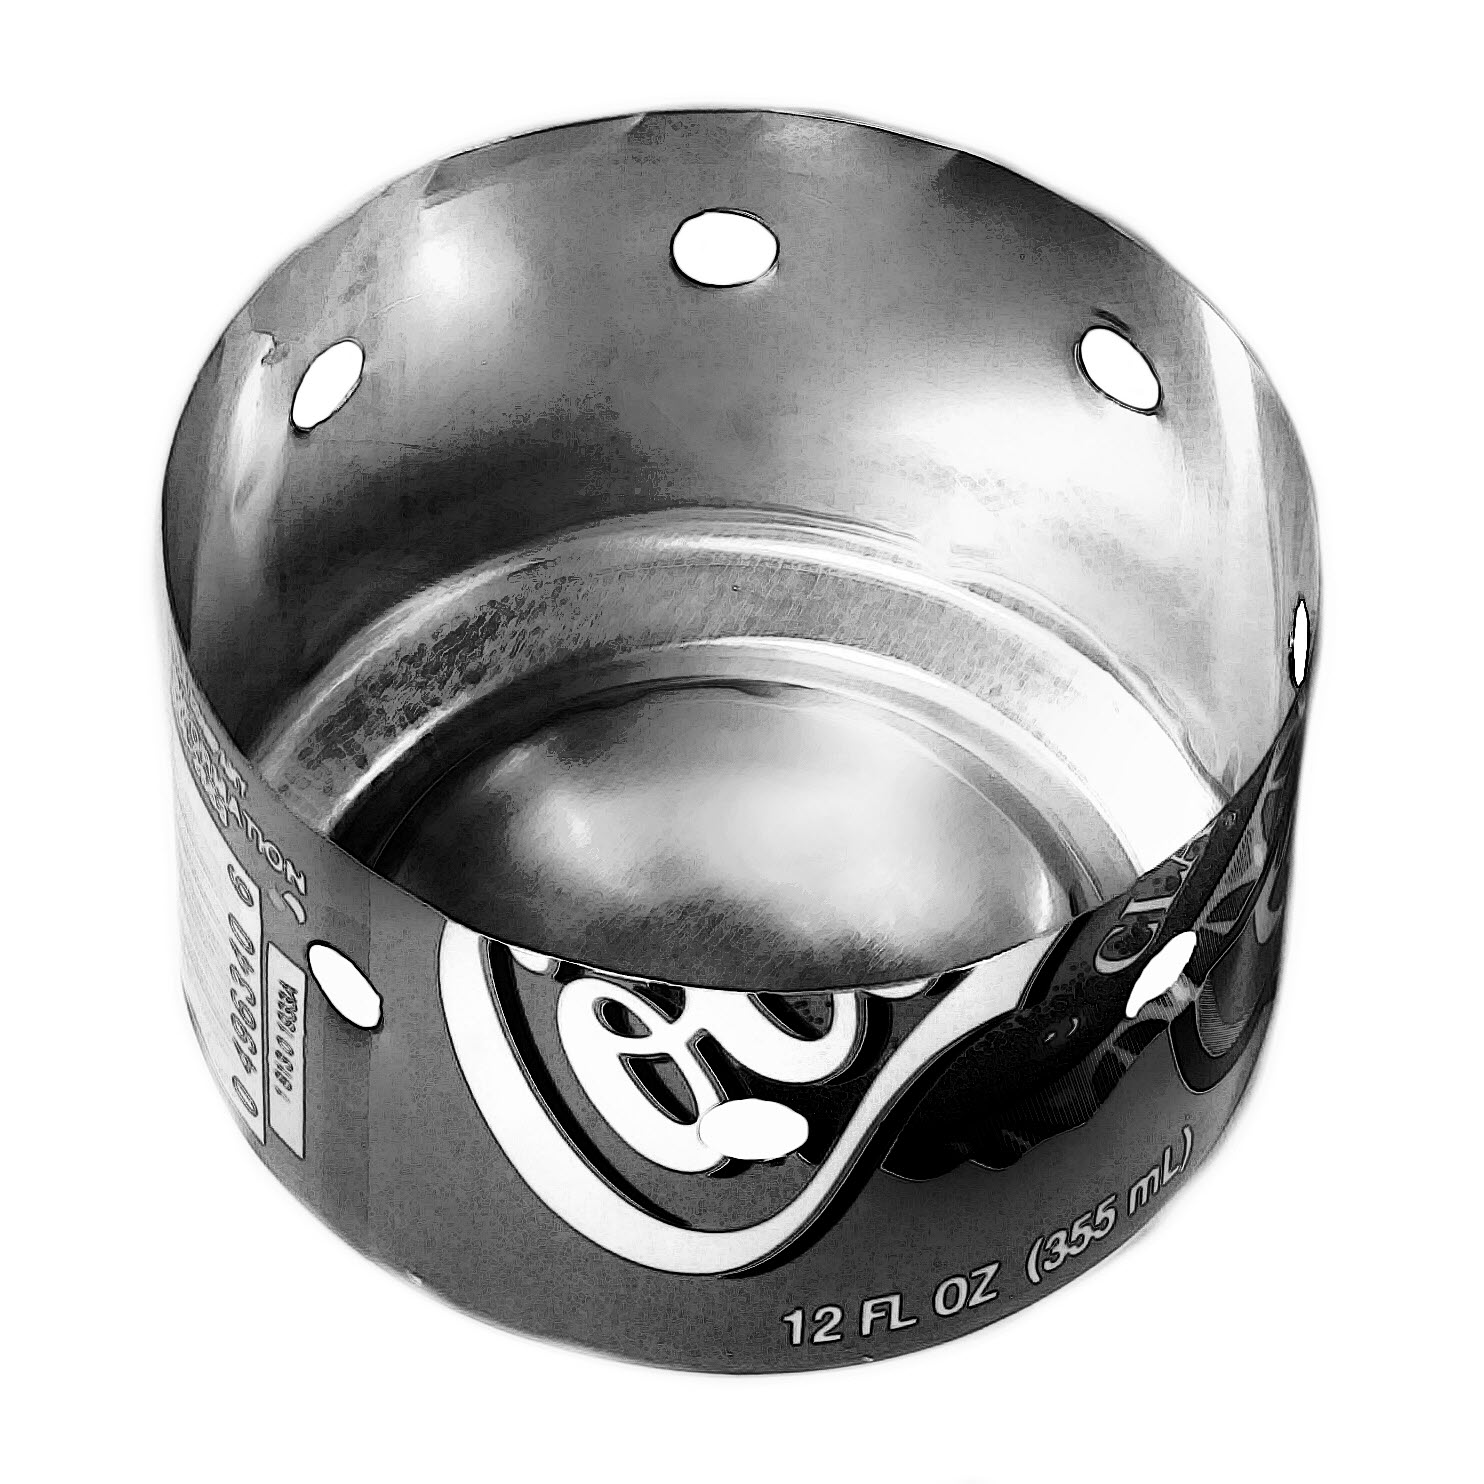
7: Drill vent holes in the can.

Set the can top side (open end) down. Wrap the paper strip around other end of the can (with the marks on the outside) and tape the ends together, and to the can, with another small piece of tape. The even, factory-cut edge of the paper template should be at the bottom (toward what is normally the top of the can).

Use a pushpin to punch a hole through the can wall at each place where you have a mark on the template.

Then remove the paper and use a fine bit, about 1/16" or smaller, and drill a hole through the can wall at each hole. You’ll have eight holes.

When you’re done drilling these holes, enlarge them. Do this by redrilling them with a 1/4" bit. We’re doing it this way because the can wall is thin and a large bit requires lots of pressure to get started. We don’t want the can wall to crumple from the pressure of shoving the drill bit against it. A smaller bit bites better and makes a good pilot hole for the larger bit.

8: Cut the burner hole.

Put on your gloves. Use the utility knife, and put its point inside the central concave spot in the bottom of the can (the side that you’ve had up). Put the knife point right on the line where this central depression starts. Keep the knife point there with a medium amount of pressure and turn the can around and around. You want to score the aluminum until you can pop out the whole center part as one disk.

This process will take a while so be patient, and try to make things more efficient by keeping the knife point running in one track, like a phonograph needle in the record groove (for any of you old enough to remember vinyl records).

Go around and around and around, until...you’ve cut deeply enough that you can tap the bottom of the can and it breaks loose. Don’t be in a hurry. This will take like what seems forever. You may have to keep scoring the can for 50 or 100 revolutions. Going slowly is not only safer, but it will give you a better result. In fact, it’s the only way to get it done. Force will not work. Let things happen in their own time.

The bottom of the can will first break through in just one spot – the whole thing won’t suddenly pop out cleanly, but you can keep working at it until you’ve got it all removed.

Some tapping with the blunt end of the utility knife will help. Tap lightly and see if anything happens. If not, then keep scoring. Eventually you’ll get a section of the can’s bottom to break through where you’ve been scoring it. Wiggle it. It will take some wiggling until the metal fatigues and lets go. Work with it. Work your way around until the whole disk pops free. Watch those fingers, though. This is extremely sharp metal.

You will end up with a pretty clean cut that needs a minimum of dressing to make it smooth and safe.

9: Dull the sharp edges.

Now take up your sandpaper and scuff the fresh edges with it until they are smooth and safe to handle. Cover all the angles, and remove every sharp edge there is.

10: Burning in.

Both the inner and outer cans need to be fired before using them to cook with.

Choose a safe, fireproof area such as a fire grate at a local park, add a small amount of denatured alcohol fuel to the stove, and burn it. About a quarter ounce will do. Check it out afterward and repeat as many times as you need to until you don’t get any smoke or burning smells coming off the stove.

Don’t set the stove on a wood fire to burn it in or you will melt it (it’s pretty thin). Take your time. Relax. Keep it fun.

Keep a pot of water nearby in case you need to quench any flames, or the stove gets knocked over while it’s burning.

11: Done.

That’s about it. Remember, this is a simple version of the cat stove. You now have a stove consisting of a simple cup to burn alcohol in, and a sleeve to go over it.

To use, put down a sheet of aluminum foil (either from a roll or cut out of an oven liner) put fuel in the cup, set it on the foil, light it, and place the sleeve over it, burner hole up. Air will enter through the vent holes at the bottom of the sleeve, rise up between the stove and the sleeve, and enter the stove. A lazy, steady flame will rise up through the burner hole. A pot stand (described later) will serve to support your cooking pot over this stove.

If the flame is too aggressive, you can cut it down by covering every other vent hole, or if you like a stove that burns faster and hotter, you can drill more ventilation holes.

From top to bottom, above:
(1) Assembled stove viewed from top and bottom.
(2) Bottom view, showing fuel cup inside windscreen.
(3) Two cutaway views of the two cups with the stove sitting upright.

Spamster Stove

Spamster Stove

Name of stove: Spamster.

Type of stove: Another cup, though at first glance it doesn’t look like one.

URL of original instructions: N/A, this is an original. (For general info on light weight do-it-yourself stoves, see the Zenstoves links page at http://bit.ly/9fZe6O)

Description of difficulty: This stove is slightly more difficult than the OCUP stove, but worth it. To make it you will need some kind of drill to put ventilation holes in the can walls. Otherwise, it’s as simple as the first stove.

Overview: This stove is a little more complex than the OCUP stove. It is much sturdier because even though you’ll be doing some cutting and poking at it, what you end up with is still one continuous piece of metal.

This stove also is more efficient because its airflow is more restricted. The OCUP stove runs at full bore. It’s wide open, and so there can’t be any explosion, but since the OCUP stove has such a wide opening at the top the combustion process is just a runaway chemical reaction.

The Spamster stove’s more restricted airflow slows things down. It’s also smaller, and its heat output is more focused, so you won’t end up with flames uselessly lapping up around the sides of your cooking pot. With the Spamster stove, all the flame will stay under the pot where it belongs.

Technical details:

Height:1.4" (36 mm)
Width:2.5" (65 mm)
Weight:0.30 ounce (8.5 g)
Volume:2 ounces (59 ml)
Composition:Aluminum can of Spam sandwich spread, pet food, or a similar can, unopened.

Materials list:

Empty Spam sandwich spread can, or a similar can, unopened
Ruler
Electric or manual drill, with 1/16" (or 3/32"), and 1/4" bits
Leather work gloves
Marking pen
Pushpin, large safety pin, or heavy needle
Sandpaper (100 grit, or thereabouts)
Sheet of paper
Tape
Utility knife

Overview of construction process: You’ll drill vent holes in the side of the can and cut a round hole in the top of the can.

Step-by-step construction:

1: Chill the can.

Leave it in the refrigerator for a few hours. This will congeal the yummy high-fat contents so they won’t be so likely to come oozing out and chase you around the room.

2: Make a ventilation template.

First, remove the label from the can.

Take a full-sized sheet of paper (8.5" by 11") and cut off a strip along the long edge. It should be one inch wide (25 mm). The whole strip should measure 1" by 11" (25 by 279 mm).

Make several marks 0.25" (6 mm) in from the factory-cut edge and use them and a ruler to make a line.

Using a small piece of tape (so you can easily remove it again in just a minute), stick one end of this paper strip to the side of the can. Then wrap this strip of paper around the can, overlap the two ends, and mark the inner layer where the outer layer of the paper strip overlaps it. Take the paper off the can.

Now you’ll have a strip of paper with a mark on it. Cut at the mark. What you have left is a strip of paper equal in length to the can’s circumference. That’s what you want.

Now fold the strip in half three times (the long way). Unfold it and mark the point where each crease intersects with the line you drew. You will have seven marks. These will mark seven of your eight ventilation holes. The eighth hole will go where the two ends of the paper strip meet when you tape it onto the can.

3: Drill vent holes in the can.

For this stove we’re going to leave the top of the can intact, so turn the can bottom side up. Then tape the paper template to the can with the factory edge of the paper along the bottom of the can (which will now be the side that’s up).

First, use a pushpin to start with. Use the pushpin to punch a hole through the can wall at each place where you have a mark on the template. Then remove the paper template.

Use a fine bit, about 1/16" or smaller, and drill a hole through the can wall at each puncture. You’ll have eight holes.

When you’re done drilling these holes, enlarge them. Do this by redrilling them with a 1/4" bit. We’re doing it this way because the can wall is thin and a large bit requires lots of pressure to get started. We don’t want the can wall to crumple from the pressure of shoving the drill bit against it. A smaller bit bites better and makes a good pilot hole for the larger bit.

At this point you will have some potted meat oozing out of can. (In case you hadn’t noticed.) You can wipe it off and cover the holes with a couple wraps of tape to get you through the next step or two.

4: Cut the burner hole.

Put on your gloves. Use the utility knife, and put its point inside the central concave spot in the bottom of the can (the side that you’ve had up). Put the knife point right on the line where this central depression starts. Keep the knife point there with a medium amount of pressure and turn the can around and around. You want to score the aluminum until you can pop out the whole center part as one disk.

This process will take a while so be patient, and try to make things more efficient by keeping the knife point running in one track, like a phonograph needle in the record groove (for any of you old enough to remember vinyl records).

Go around and around and around, until...you’ve cut deeply enough that you can tap the bottom of the can and it breaks loose. Don’t be in a hurry. This will take like what seems forever. You may have to keep scoring the can for 50 or 100 revolutions. Going slowly is not only safer, but it will give you a better result. In fact, it’s the only way to get it done. Force will not work. Let things happen in their own time.

The bottom of the can will first break through in just one spot – the whole thing won’t suddenly pop out cleanly, but you can keep working at it until you’ve got it all removed.

Some tapping with the blunt end of the utility knife will help. Tap lightly and see if anything happens. If not, then keep scoring. Eventually you’ll get a section of the can’s bottom to break through where you’ve been scoring it. Wiggle it. It will take some wiggling until the metal fatigues and lets go. Work with it. Work your way around until the whole disk pops free. Watch those fingers, though. This is extremely sharp metal.

You will end up with a pretty clean cut that needs a minimum of dressing to make it smooth and safe.

5: Cleanup.

Remove the contents of the can and wash it out. Handle it carefully at this stage because the can still has a lot of viciously sharp edges. Once you’ve scooped out out most of the contents you can clean the can using some kind of brush so you don’t have to handle the can too much. The edges are still razor sharp. The can will be pretty greasy too, and you won’t get into every interior corner so getting it squeaky clean will be impossible.

Concentrate on cleaning the outside of the can and let the residual grease inside combust away when you burn in the stove.

Also you don’t want to try eating what was in the can, or even feeding it to a pet, because it will have metal shavings in it. And at this stage you have been poking pins and drill bits into it for a while. The technical term is “yuk”.

After cleaning the can, put on your work gloves again and smooth the sharp edges of the vent holes and the central burner hole using sandpaper until the stove is safe to handle without gloves.

6: Adding an optional wick.

Cut a 0.5 inch-wide (13 mm) strip of fiberglass insulation. You should need about 8" to 10" (200 - 250 mm). Roll it up and stuff it into the can through the central hole. Be sure that the fiberglass doesn’t cover the ventilation holes you drilled.

Fiberglass insulation (which does not burn) will form a wick for the stove. It will help to prevent spills if you should knock the stove over, and will slow down the burning somewhat, and keep the stove going longer at a lower temperature, but the wick isn’t essential.

If you use a wick, you’ll find that the flame will taper off very slowly as the fuel runs out, to the point that you’ll want to remove your pot from the stove several minutes before the stove actually goes out. The flame will keep getting smaller and smaller and smaller until, although it’s still there, it is just a speck and too small to provide enough heat for anything. If cooking during daylight hours, you will not be able to see the flame as it tapers off. It gets really tiny and dim toward the end.

Without a wick the stove will burn faster in a less controlled way. The stove will suddenly just wink out. When the stove has no wick, and goes out, you know for sure that all the fuel is gone. If you use a wick and blow out the stove because you can’t stand to wait for it, there will still be some fuel down inside, and you will have to be more careful in case the hot stove should reignite some residual fuel when you’re not watching it.

7: Burning in.

The stove needs to be burned in before using it to cook with.

Choose a safe, fireproof area such as a fire grate at a local park, add a small amount of denatured alcohol fuel to the stove, and burn it. About a quarter ounce will do. Check it out afterward and repeat as many times as you need to until you don’t get any smoke or burning smells coming off the stove. This will take care of any leftover grease inside the stove.

Don’t set the stove on a wood fire to burn it in or you will melt it (it’s pretty thin). Take your time. Relax. Keep it fun.

Keep a pot of water nearby in case you need to quench any flames, or the stove gets knocked over while it’s burning.

To use, put down a sheet of aluminum foil (either from a roll or cut out of an oven liner) put fuel in the cup, set it on the foil, and light it. A pot stand (described later) will serve to support your cooking pot over this stove.

Wednesday, February 19, 2020

Open Cup Stove

Open Cup Stove

Name of stove: OCUP (Open Cup stove. Originally “Fritz Krueger PASS Plain And Simple Stove”.)

Type of stove: Simple cup, with ventilation holes added.

URL of original instructions: See Fritz Krueger’s PASS (Plain And Simple Stove) http://bit.ly/K36FOS or http://bit.ly/LlWjeN (For general info on light weight do-it-yourself stoves, see the Zenstoves links page at http://bit.ly/9fZe6O)

Description of difficulty: This is a smallish to tiny, extremely light stove that can easily be made with the simplest tools.

Overview: This is one of the simplest stoves possible. The large opening at the top produces a wide flame, so this kind of stove will burn through its fuel relatively rapidly.

The only simpler stove is one made without any manipulation at all. If you want the simplest of the simplest, buy a box of tea candles, remove one candle from its aluminum cup base, and use the cup. These are said to weigh about 1/16 ounce (0.06 ounces, or 1.8 g). I use the scale at the post office, and it won’t register anything that light, so let’s just assume that this figure is right. It doesn’t get any simpler or lighter than that.

A perforated cup breathes a little better though, and takes hardly any extra effort to make. It’s also slightly bigger and heavier, no matter what you make it out of (it’s going to be bigger than the tea candle base) but not enough to matter. Hey, we’re talking a few tenths of an ounce here. For raw material you can use either a 12 ounce or a 5.5 ounce aluminum can.

This stove is a little on the delicate side, since its top us just a cutaway can. It is easy to bend out of shape, but also easy to bend back into shape. Because the bare edge of the cut can is exposed, you have to be especially careful in cutting away the top of the can and in smoothing down this edge when done.

Because it’s so simple and easy to make, though, this stove is a good place to start. Get familiar with it, see how it works, and then decide whether alcohol stoves are for you. You can always move up later.

These directions use a 12-ounce can, but if you want a smaller version, use a 5.5 ounce juice can and reduce the dimensions as needed.

Technical details:

Height:1.75" (44 mm)
Width:2.6" (65 mm).
Weight:No more than 0.1 ounce (2.8 g).
Volume:3.5 ounces (104 ml).
Composition:Aluminum drink can (12 ounce version) or juice can (5.5 ounce version).
Cost:Free, with contents of cans.

Materials list:

Empty 12 ounce (355 ml) aluminum can
Ruler
Hole punch for paper
Magazines, cardboard, thin books
Marking pen
Sandpaper (100 grit, or thereabouts)
Sheet of paper
Tape
Utility knife
Work gloves

Step-by-step construction:

1: Mark the can.

Put a line on the side of the can to show you where to cut.

Set the can down on a smooth surface like a kitchen counter top. Next to it, plunk down several magazines. Lay your marking pen on the top magazine, push the can over to it, and measure where the point of the pen meets the can. You’re looking for a point 1.75" (44 mm) up from the bottom of the can.

If the pen point is either too high or too low, shuffle different magazines until you get a stack that’s the right height. You may have to do some fine tuning with scrap sheets of cardboard from the back of a tablet of paper, or use several thicknesses of paper — what you use doesn’t matter much. You can sandwich any loose sheets of paper in between two of the magazines and that will keep them in place.

Then hold down the pen and turn the can through one or two revolutions until you have a clear, dark line of ink going around the can at a height of 1.75" (44 mm).

Cutting at this height will give the stove a deep well for fuel and will leave plenty of room in the stove’s side walls for ventilation holes.

2: Score the can.

Once you have a line drawn around the outside of the can, set aside the pen and put the utility knife in its place. Be sure the knife has a sharp, new blade in it. And it’s a good idea to wear work gloves for this step, especially leather gloves if you have them.

Lay the knife down flat on its side on top of your pile of magazines and put the blade’s point up to the can. Adjust the height until the point hits the line you’ve just drawn. Hold the knife down with one hand and rotate the can with the other hand, scoring the can. Push the blade against the can, but not hard enough to dent it.

Keep turning the can carefully for several revolutions. You want to make a deeper and deeper score line in the side of the can, and you want to keep the knife in the same groove on each pass. This is pretty hard to do perfectly, but get as close as you can. You are not trying to cut through the can, only to score it.

3: Break off the bottom of the can.

When you think you’ve cut most of the way through the side wall of the can you need to stress it. Use the back side of your knife’s blade (the dull side) or your thumb. Press hard enough to flex the side of the can a little without denting it, and move back and forth along the score line.

Stress a short section of the the can wall this way over and over again. What you’re doing here is trying to fatigue the metal of the can until it breaks apart. This will give you a cleaner result than if you cut through the can with the knife.

This part of the process is trial and error, so just keep at it until you find a scored part of the can’s wall that just lets go. You can go back to scoring the side again for awhile, to deepen the cut if this doesn’t seem to be working. It takes a while to start working.

Once part of the scored line breaks through you can keep working along it, turning the can and breaking it apart along your scored line until the top part separates from the bottom part. Once you get the process started, it will be a give and take between stressing the metal and gently pulling the two halves of the can away from each other.

Work very gently. The two main things to keep in mind are not to damage the can and not to get cut. The can will separate when it’s ready.

When done with this first step you’ll have the bottom 1.75" of the can separated from the top.

4: Dull the sharp edges.

Now take up your sandpaper, hold the bottom (your new stove, the cup-like part) in one hand, the sandpaper in the other, and scuff the fresh edge with the sandpaper. You want to run the sandpaper in three different directions: flat across the cut edge, outside, but angled toward the inside of the stove, and inside, but angled toward the outside.

In other words, you want to cover all the angles, and remove every sharp edge there is. This is important, because this thin metal is just about as close as you can get to a free-range razor blade. It is deadly sharp. Please read that again if it didn’t sink in. IT IS SHARP!

5: Make a ventilation template.

Take a full-sized sheet of paper (8.5" by 11") and cut off a strip along the long edge. It should measure 1.5" by 11" (36 by 279 mm).

Make several marks 0.5" (13 mm) in from the straight factory-cut edge and use a ruler to connect them so you have a line.

Using a small piece of tape (so you can easily remove it again in just a minute) stick one end of this paper strip to the side of the can.

Then wrap this strip of paper around the can, overlap the two ends, and mark the inner layer where the outer layer of the paper strip overlaps it. Take the paper off the can.

Now you’ll have a strip of paper with a mark on it. Cut at the mark. What you have left is a strip of paper equal in length to the can’s circumference. That’s what you want.

Then fold this strip of paper in half three times (the long way). Unfold it and mark the point where each crease intersects the line you drew lengthwise along the strip. You will have seven marks. These will mark seven of your eight ventilation holes. The eighth hole will go where the two ends of the paper strip meet when you tape it back onto the can.

6: Make ventilation holes.

Wrap the paper strip around the top edge of the stove (with the marks on the outside, toward the top — the cut edge of the stove). Then connect the ends of the strip and hold it in place with another small piece of tape. Leave this spot until last.

Center your paper punch over the next mark you come to and punch a hole through the paper strip and the wall of the can.

Keep this up until you come back to the tape, and make your final hole there. Remove the tape, put your gloves on, and sand down both the insides and outsides of the holes until you’re sure that they are safe enough to handle with bare hands.

7: Burn in.

The stove needs to be fired before using it to cook with.

The exterior of the stove is covered with printing. It will stink and smoke until you get that burned off.

Choose a safe, fireproof area such as a fire grate at a local park, add a small amount of denatured alcohol fuel to the stove, and burn it. About a quarter ounce will do. Check it out afterward and repeat as many times as you need to until you don’t get any smoke or burning smells coming from the stove.

Don’t set the stove on a wood fire to burn it in or you will melt it (it’s pretty thin). Take your time. Relax. Keep it fun.

Keep a pot of water nearby in case you need to quench any flames, or the stove gets knocked over while it’s burning.

To use, put down a sheet of aluminum foil (either from a roll or cut out of an oven liner) put fuel in the cup, set it on the foil, and light it. A pot stand (described later) will serve to support your cooking pot over this stove.

Finished. Stove shown upright. Crunches right up if you step on it. Pretty big as these things go and produces a large flame.

Steps in cutting down can and punching holes in side. One, two, three. That’s about it.

Notes On Making Stoves

Notes On Making Stoves

Note on measurements: They’re all close, as close as I could manage, but still only approximate. For example, 1.5 inches may actually be 1 and 15/32 inches instead of 1 and 16/32 inches instead of 1 and ½ inches, and its metric equivalent may be off by a millimeter. Go with the flow. This is kitchen counter-top stove hacking, not military science. Not even model rocket science.

If you have a metric ruler it’s probably easier to use that since the divisions are smaller, and you only have to multiply or divide by 10 — no juggling between eleven sixteenths and five eighths and three fourths, and deciding which to use, then getting out your calculator and converting to decimals, and so on.

BackpackGearTest.org has a nifty English to metric, metric to English conversion utility that you can use online for free whenever you fancy (http://bit.ly/KmQW30).

Wednesday, February 12, 2020

Story Break: The Ratgas Stove

Story Break

The Ratgas Stove

Nuts and bolts and tin snips take you only so far. A mechanic makes things. A visionary dreams them up first. I’d like one of those new cars. One of those hybrids. Maybe. Not sure if they’ve gone far enough yet. It could be that people need to dream a little more first. There’s the full electric car, and then there are designs with other kinds of batteries, like the mechanical flywheel battery or the car that runs on compressed air, or the hybrid that stores up energy in a hydraulic system every time you step on the brakes.

Imagination can take you places you never would have thought. That’s where I went one day while daydreaming and came up with the idea for stove that runs on rodent farts.

Biogas, from little Herbie, my hamster pocket pal, or a larger stand-in, more rugged, with bigger output than my friend. Sort of an industrial version of my pet. Like a rat. I feed Herbie a lot, and he poops it out. Why not hook up his butt to a little tank and catch all his gas? That was the original inspiration.

I was thinking a small lubricated catheter sliding up under his tail, connected to a thin rubber hose, connected to a tank. The tank could be an air tight plastic bag of some kind. When mealtime rolls around, just set a rock on the bag to pressurize it and run the gas through the hose into a small stove. Voila!

But Herbie didn’t like it. At all.

I would have needed a valve on his end to stop backflow too. Another complication. To prevent hamster explosions.

I tried having conversations with Herbie, to get his point of view, but I’m not really sure that he was listening. He wouldn’t even sit still. Even inspecting his undercarriage was touchy, him being fairly protective there and all. If you’re on good terms with one, you can just pick up a hamster and look at pretty much anything you want, but they’re so small and twitchy that you can’t even begin to poke around with your fingers. Fingers as big to a hamster as telephone poles would be to one of us.

Hamsters, when they stay still, do it for about two and a half seconds, max. Tip: Don’t try poking around with the point of a pencil unless you’re wearing gloves, even being delicate. Hold your hamster gently, over something soft, like a pillow. In case he takes off like a moon rocket instead of just deciding to bite your thumb off, which he’ll usually do. He can’t always control his reflexes and deserves a soft landing whether he leaves you bleeding or not.

Anyhow, that idea didn’t get too far. I decided pretty soon that no hamster really wanted to be “on line”. I never really tried to hook Herbie up, exactly. Not all the way. Did some early experiments, but I backed off before it went too far, with some strong encouragement from him, and since then we’ve managed to reestablish our friendship for the most part.

I did take an earlier version of Herbie to school once, and that probably taught me all I needed to know, really. I was about 14 and thought it would be fun to take my little buddy along for the day. Since hamsters are nocturnal they usually just want to curl up and go back to cutting zees as soon as possible, whenever you have them out during the day.

I used to take him grocery shopping with my parents. Mom, Dad, me, and Herbie, in my shirt pocket. He’d stand there inside my shirt pocket on his back feet, with his little hands gripping the top of my pocket, and look around at everything, little nose whiskers twitching, sniffing the air. Bright, beady eyes shining under the fluorescent lights.

Going by the produce section I’d grab a pinch of lettuce or celery and feed him. After that he’d curl up inside my pocket and go to sleep, popping up again to watch checkout time, if at all. No one ever saw him. He never made a fuss, just stood there in my pocket and watched, or curled up inside, down in the bottom next to my heart, and slept. Like I had one furry teenage boy breast.

Didn’t work quite as well at school that winter day. Oh, Herbie behaved himself in the left pocket of my cardigan. That was all right. He slept curled up in his usual little ball. But it was about halfway through Latin class, around 10:30, that I realized this wasn’t a really good idea. I sat there waiting for him to wake up and climb out, looking for a place to pee, or for a snack. Or maybe he would just decide to try sleepwalking for his first time ever, right there and then.

Never seen a hamster sleepwalking, but Herbie was adventurous and unusually intelligent, and if one of us could do it, it would be him. He could do anything. But if he’d never sleepwalked before, he wouldn’t have been very good at it. He would be winging it, learning it right there in the second half of Latin class, or next period, in English, or maybe in the hallway between the two. I didn’t need him to bail and tear down a hallway crammed with goofy trampling teenager feet.

I saw a mouse in a library once. It was running across a carpet, chased by half a dozen well-meaning students. I didn’t want that for Herbie. I didn’t want to see him stopped dead by the sole of someone’s shoe, with tread marks all down his back. He was my friend. You don’t do that to friends, and if you’re the small one in the relationship, you don’t want that happening to you.

It could be that he was partying hard the night before. Something worked. He remained unconscious. He kept up his tiny snoring all the way through Latin class, then through English. At noon I took him home and put him back into his cage. He never said anything in particular about that day but I think it could be that he was relieved too.

You know, that makes me think. It would be even harder carrying a hamster on a backpacking trip. One wouldn’t be enough either. Anyway, hamsters are too small. You’d need rats. And there’s the tail. My sister likes rats, but have you every seen a rat’s tail in person? Like a creepy pointed snake being dragged around all over, backwards . It’s almost alive all on its own. I still don’t know if rats ever fart, but even a rat fart has to be pretty small, so you’d need a lot of them to run even the smallest stove.

You could collect a bunch of droppings, maybe, in a plastic bottle, and let them ferment. Change that stuff into methane, but you’d need a week with a tweezer to pick up enough rat poops ahead of time (like grains of wild rice, black). Forget about it on the trail.

Maybe better to collect some of your own poo on the first day of a trip and make gas from that. Maybe not, come to think of it. Lots of issues there, even on a solo trip, gag reflex and all. You can’t tell anyone what you did, even if it worked OK. Ever. I’ve learned that lesson the hard way. Not with poop exactly, but well, let’s drop it now, if we can use that word here.

What you’d end up with is like a portable sewage treatment plant made from tubing and plastic bottles (plastic bags would be WAY too likely to break open — let’s not go there either). Wouldn’t know just where to carry it. Big downsides if this gizmo came apart in your pack. Very big. Could put you off your feed for a good while. People you met on the trail would know something was up, even standing way back. They could tell.

Don’t know where to take what’s left of this idea. Have wondered how this might work with one medium-sized dog rather than a 12-pack of rats. You can train dogs, anyway. Maybe it needs more thought. Maybe not. Might make a good display at the dung museum in Glandular, Wyoming.

So long.

Obtaining Fuel

Obtaining Fuel

It is a mistake to think you can solve any major problems just with potatoes. — Douglas Adams

Trade loves moderation, delights in compromise, and is most careful to avoid anger. It is patient, supple, and insinuating, only resorting to extreme measures in cases of absolute necessity. — Alexis de Tocqueville

Imagine that you are sitting beside a trail. You’ve been hiking hard all day, and you’ve just stopped walking. You’re tired and hungry. You are about to cook supper. You have food and water — everything you need. Your stove is set up, the pot is full of water, the food is waiting to be cooked. You bend over. You light a match. You open the stove’s valve. You realize that the fuel canister is empty. What do you do now?

Well, you make a small wood fire to cook over. You get by, but it’s inconvenient. Tomorrow you’ll hit the next small town on your thousand-mile trip. You will rent a motel room, rest and resupply.

Tomorrow comes. You get into town, clean up and go out to eat. It’s a fine bright sunny morning. Life is good. You start looking for things you need, like a fuel canister for your stove. The town has two gas stations, a grocery store, a hardware store and a bar. No outdoor shops. No canisters at any price. You’re out of luck.

OK, rewind. You don’t have a canister stove. Let’s say you’re carrying a white gas stove. Same scenario. You make it into town and go out resupplying. You’re in luck this time. The hardware store happens to stock white gas, and it has one can. The can holds a gallon. You’re all set. Except that you need a pint of fuel, not a gallon. Too bad.

Rewind again. This time you’re carrying an Esbit stove. Same scenario. You ask around town about Esbit fuel tablets. You have to explain to people what you mean. Someone calls the sheriff.

Rewind. You’re burning alcohol. In town you find gas line deicer at both gas stations, and denatured alcohol at both the grocery and hardware store, in quart cans. More than you need, but you can carry a little extra. Problem solved.

Other options. You can have someone mail fuel canisters or Esbit fuel, addressed to you at general delivery. You have to be in the right town at the right time (though general delivery mail can be held for you for up to 30 days). You also have to pay for postage, and you need someone back home who is dependable enough to send it out to you. If your pal spaces out, you’re screwed.

White gas is still an iffy proposition because you can’t mail it, and not every store in every town sells it.

Rewind one more time. This time you’re carrying a wood burning stove. You have no problems other than finding dry fuel. In a pinch you can burn grass or bark or even less savory things. You’ll find something to burn no matter where you are. If you like, you can carry a few charcoal briquettes as an emergency backup — bulky, frangible and sooty but pretty cheap and guaranteed dry. Or just cache a small bundle of sticks in a plastic bag at the bottom of your pack against the next rainy day.

Like most things, the less extreme your needs, the less it matters which choices you make. If you go out backpacking twice a summer for three days each time, you can survive just about anything short of a fall off a cliff or being eaten by a hitherto unknown and unspeakably horrible and ravenous monster beast in the dead of night. Stove type is just about irrelevant. If you’re out for several months, thousands of miles from home, then you have to think a lot harder about what you’re going to be doing out there when conditions aren’t perfect. And they won’t be.

Somewhere, somewhen, you will have problems, possibly with the monsters. Maybe they didn’t make a move last time, or the time before that, but there is one thing to keep in mind about monsters: they are very, very patient. They choose their targets with excruciating care and they can wait. They can wait a long, long time. They know what they like, and what they like may be you.

In fact, if you have never felt uneasy in the woods, have never heard a strange noise or awakened in the night, your heart racing, lying so still, in absolute terror and full of certainty that there is SOMETHING wild and pathologically dangerous drooling through its fangs mere inches from where you lie, then it is because they are already after you, and have taken especial care to stalk you with the utmost of deliberate stealth and silent precision, to keep you unaware until the very last instant before the irresistible jaws snap shut over your whole head, so look out, look out my friend, because your time is near.

Exercises

  1. Take it easy. Skip this section. Sleep in or catch a movie on TV instead. Assume that things will work out. You’ve always squeaked by before, right? Whatever.
  2. Go to www.usps.com and try to find information on either flammable or hazardous materials. Best wishes and good luck with that. Searching for the word “flammable” will likely get you zero hits. A search for the phrase “hazardous substances” at one time resulted in two hits: “Mailpiece leaking an unknown powdery substance” and “Glossary of Postal Terms G-L”. The first hit from a search on “hazardous materials” got “USPS News Link Online”. As of December 9, 2006, the top story on this page was from April 25, 2003, “New deal! USPS employees can now ring up savings with Nextel wireless.”
    Yay.
    The third hit from a search on “hazardous”: “Common hazardous materials in the mail”. This went to “DMM TOC > 600 Basic Standards for All Mailing Services”, where section 10 began to explain all this.
    If there is a link to “Aviation Security” under “All Products and Services” it might tell you that flea collars, nail polish, airbags, batteries and dry ice are hazardous, not to mention glues.
    Search on the phrase “Santa Claus”? Five apposite hits:
    1. Writing a letter to Santa Claus
    2. PARENTS sending Santa Claus letters
    3. Using / Reusing boxes
    4. Personalized Holiday & Gift cards available online
    5. 1-800-ASK-USPS (1-800-275-8777) Holiday Hours
      Try to figure this out. Don’t contact me to complain. My misery doesn’t want to love your company. Instead try banging your head against any nearby wall that you find handy. Repeat as often as necessary until you feel better.
  3. Did you see something? Out there, a few feet off, behind, over your shoulder? Probably nothing. Probably nothing. Shouldn’t worry too much. Heh.

Wednesday, February 5, 2020

Story Break: Bag Cooking

Story Break

Bag Cooking

Nowadays, for a woman, there’s no reason be stuck in the kitchen cooking all the meals, plus doing the laundry and wiping the kids’ noses and doing all the housework, and that’s true. Who would put up with this any more?

There are women who want to be famous and spend their whole lives being adored in front of TV cameras, and of course they expect somebody else to handle the gritty uninteresting details of their lives. Well, that’s nice, and good work if you can get it, and if you want it. But the vast majority of women still have to get their hands dirty, and most of them don’t mind, as long as it’s for the cause of home and family.

My mother insisted that the kitchen was her place and she liked it that way. She was married but wasn’t a slave, and cooked because she liked doing it. She was good at it too. The kitchen was her workshop the same way that the garage was my father’s workshop.

I think it’s up to every woman to do what’s right for herself, in the context of her own life, political correctness notwithstanding. When my mother didn’t want to cook, she had Dad take her out. End of story. I like to cook, and do most of it, but when it doesn’t work out for me, my husband takes his turn, or we go out. He listens, he shares, and he does. You can’t be married and be a slave or a master. You can be a mistress, but we won’t get into that just yet. Wait for another book some day.

In my house we cut all the work down the middle — it’s a partnership but I usually drive the kitchen. It’s just in me. Deal with it.

My husband can do the basics. He’s great with a can opener and a toaster but he’s learned through an extended training regime of trial and error not to extend himself so far that he might get hurt. His guiding principles have become speed and simplicity, and I can’t complain. He knows his limits. If supper gets done and tastes good, we don’t have anything to argue about, especially if he’s doing all the work.

Back to hiking. Sometimes I’ll go for a hike in the woods on a nice day, and cook a lunch. Not always, but occasionally. It can be nice too. Cooking can work for one slow lunch in the middle of a lazy day hike, and preparing real meals can also work day after day during a long backpacking trip. I understand why people might want to put thought and energy into cooking on the trail, and welcome to them. Nothing wrong with that, but it’s not for me.

My husband and I prefer to travel light and avoid the pain and fussle of handling fresh ingredients, and pots and pans, and hours of cooking, and washing dishes. We’d rather explore and experience the scenery and save the table tangos for our time at home. I’m not going to go out with a sack hanging on my back and get dusty and sweaty and sleep in the dirt, and then spend hours a day dicing vegetables and simmering sauces. I’m smarter than that, and I’m lazier too.

With those ideas in mind I’ll present bag cooking for the trail. If you don’t do the cooking, whoever you are, then pass these ideas along to your designated kitchen churl.

So get yourself some quart ziplock bags, the freezer kind. They’re thicker. And get the bags whose brand isn’t “X”. Brand X doesn’t hold up. X means “avoid”. When you buy a name brand you pay for a name, but a little extra quality comes along for the ride, and quality pays dividends on the trail. You don’t want a bag letting go right when supper is done and you’re lifting it out of the pot. Try experimenting at home first, where you can get your technique down. It is not hard at all, but you want to have your failures happen where you can recover, and not out in the woods.

Here’s an easy if plain recipe for one hungry hiker:

  • 1 cup couscous
  • 2 tablespoons butter or oil
  • seasoning (garlic powder, onion powder, 3 to 4 teaspoons bouillon grains, or some Mrs. Dash seasoning mix)
  • salt or 4 tablespoons Parmesan cheese

At home, combine the ingredients in a small metal bowl or a metal cup. If you use a plastic bowl the seasonings and powdery substances will pick up a static charge and float over to the outside of the bag, then cling like death. If they stay there they’ll give off unusually interesting aromas which may attract bears or other uneducated guests.

Carefully pour ingredients into the ziplock bag by cupping the bag around the mixing bowl. Using a small bowl or cup makes it easier to do this. Then seal the bag, leaving lots of air inside, but make sure that the seal is really closed — tight. Shake the bag to mix all ingredients. Finally, squeeze excess air out through one corner and reseal the bag. Your meal is now ready for packing.

To cook, first heat two cups of water to nearly the boiling point. A rolling boil will not make the water any hotter and will just waste fuel, so “to the boiling point” is perfect.

When the water is ready, use a pot gripper to pick up the pot. Hot water hurts, so be careful here. You might have gotten a pot gripper with your cook set, or bought one. It’s probably handier and a little safer than using gloves, but it’s a single-purpose item, so using gloves you are already carrying saves some weight, but of course this is your decision.

Set the bag flat on the ground or get it as stable as you can. You don’t want it to tip over, so hang onto it. Open the bag of dry food and continue to hold it open with one hand while you pour hot water into the bag, being very careful not to scald yourself. Believe me, I’ve done it, and a big blister on your thumb is a poor companion. You don’t want any injuries, especially somewhere on a trail far from medical services.

When you have finished pouring hot water into the bag, close it up while squeezing the air out of it. Make extra special sure that the closure is sealed tight, then knead the bag with your fingers to massage hot water into the food. You’ll need gloves for this step, whether or not you have a metal pot gripper.

Then set the food bag aside, covered, for five to 10 minutes. If you’re not a starving hiker this recipe will make too much to eat, but if you experimented at home first you have adjusted the recipe to your own needs.

Instead of couscous, you can also try a package of seasoned instant mashed potatoes. At home, add powdered milk for protein, and maybe some grated cheese, and leave out any extra seasonings. The preseasoned potato mixes can get by without help from extra seasonings. Butter is good though.

Another possibility is instant bean mixes, if you can find them. There are refried and black bean mixes out there, and they are good. They cook up well and are spicy. And you can blend either one with instant mashed potatoes to more closely resemble a real meal.

Also, you can freeze tofu to drive the water out, then slice it thin, dice it, and dry it in your oven at home. Don’t forget textured vegetable protein (TVP), which sort of tastes like food, or real or artificially-flavored bacon bits, nuts, and items like dried shrimp from Asian food stores.

If you’re really cheap try ramen noodles. For one hungry hiker use two packages. To reduce volume and make them easier to handle, crush the noodles inside their packages before opening at home, then put the noodles into a ziplock bag. Add only one of the packages of included seasoning, and some grated cheese, and seal it up. This is one meal that does not need much mixing, and rehydrates fast, especially with crumbled noodles.

Couscous, dried bean mixes and ramen noodles are all pre-cooked so they need only hot water. Ramen noodles have a surprisingly high fat content as they come to you (read the label!), so you don’t need extra fat. Instant mashed potatoes are the hardest to get thoroughly mixed with water but the fastest to cook. You can eat them as soon as they’re cool enough.

That’s about it. When you’re done eating you can stuff used plastic bags inside each other and seal them up, then carry out all your trash just like that, in one big odor-free lump.

Another advantage of this cooking method is that if you are the one doing the cooking, and have a fussy eater along, like a child or a boyfriend, you can hold an open bag of prepared food in one hand, put your free hand behind your loved one’s head, and just shove it in. No fuss, no coaxing needed. There is no whine bar near my kitchen.

It works.